Setting up TeslaLogger with a self-hosted Telemetry Server
This post expands in a bit more detail setting up TeslaLogger with a Local / self-hosted Tesla fleet telemetry server as outlined here:
TeslaLogger/TeslaLogger/LocalTelemetry.md at master · bassmaster187/TeslaLogger
TeslaLogger is a self hosted data logger for your Tesla Model S/3/X/Y. Actually it supports RaspberryPi 3B, 3B+, 4B, Docker and Synology NAS. - bassmaster187/TeslaLogger
If you don't need a writeup, here's the docker compose and configs for the stack:
services:
  fleet-telemetry:
    image: tesla/fleet-telemetry:latest
    command:
      - /fleet-telemetry
      - -config=/etc/fleet-telemetry/config.json
    ports:
      - 12345:12345
      - 5284:5284
    volumes:
      - ./config.json:/etc/fleet-telemetry/config.json:ro
      - ./certbot/conf/live/yourtelemetry.domainname.com/fullchain.pem:/certs/fullchain.pem:ro
      - ./certbot/conf/live/yourtelemetry.domainname.com/privkey.pem:/certs/privkey.pem:ro
  tesla_http_proxy:
    image: tesla/vehicle-command:latest
    ports:
      - 4443:4443
    environment:
      - TESLA_HTTP_PROXY_TLS_CERT=/config/tls-cert.pem
      - TESLA_HTTP_PROXY_TLS_KEY=/config/tls-key.pem
      - TESLA_HTTP_PROXY_HOST=0.0.0.0
      - TESLA_HTTP_PROXY_PORT=4443
      - TESLA_HTTP_PROXY_TIMEOUT=10s
      - TESLA_KEY_FILE=/config/fleet-key.pem
      - TESLA_VERBOSE=true
    volumes:
      - ./certbot/conf/live/yourtelemetry.domainname.com/fullchain.pem:/config/tls-cert.pem:ro
      - ./certbot/conf/live/yourtelemetry.domainname.com/privkey.pem:/config/tls-key.pem:ro
      - ./certs/private-key.pem:/config/fleet-key.pem:ro
  certbot:
    image: certbot/dns-cloudflare:latest
    volumes:
      - ./certbot/lib/:/var/lib/letsencrypt/:rw
      - ./certbot/conf/:/etc/letsencrypt/:rw
    command: certonly --non-interactive --agree-tos --dns-cloudflare
      --dns-cloudflare-credentials /etc/letsencrypt/cloudflare.ini -d
      yourtelemetry.domainname.com
  web:
    # This needs to be set up with SSL. Either configure it w/ the same LE certificate from above, or put this behind Cloudflare / reverse proxy that provisions automatically.
    image: nginx
    volumes:
      - ./html:/usr/share/nginx/html:ro
    ports:
     - "80:80"
    environment:
      - NGINX_HOST=yourtelemetry.domainname.com
      - NGINX_PORT=80
    restart: unless-stopped
fleet-telemetry/compose.yaml
{
    "host": "",
    "port": 12345,
    "log_level": "debug",
    "json_log_enable": true,
    "namespace": "TeslaLogger",
    "reliable_ack": true,
    "transmit_decoded_records": true,
    "logger": {
      "verbose": true
    },
    "zmq": {
        "addr": "tcp://*:5284",
        "verbose": true
    },
    "records": {
      "alerts": [
          "zmq"
      ],
      "errors": [
          "zmq"
      ],
      "V": [
          "zmq"
      ]
    },
    "tls": {
      "server_cert": "/certs/fullchain.pem",
      "server_key": "/certs/privkey.pem"
    }
}
fleet-telemetry/config.json
<?xml version="1.0" encoding="utf-8"?>
<configuration>
...
  <applicationSettings>
    <TeslaLogger.ApplicationSettings>
      ...
      <setting name="TelemetryServerURL" serializeAs="String">
        <value>tcp://192.168.xxx.xxx:5284</value>
      </setting>
      <setting name="UseTelemetryServer" serializeAs="String">
        <value>True</value>
      </setting>
      <setting name="TelemetryServerType" serializeAs="String">
        <value>ZMQ</value>
      </setting>
      <setting name="TeslaHttpProxyURL" serializeAs="String">
        <value>https://yourtelemetry.domainname.com:4443</value>
      </setting>
      <setting name="TelemetryClientID" serializeAs="String">
        <value>YOUR_TESLA_APPLICATION_CLIENT_ID</value>
      </setting>
    </TeslaLogger.ApplicationSettings>
  </applicationSettings>
...
</configuration>
teslalogger/TeslaLogger/bin/TeslaLogger.exe.config
^ If this file doesn't exist, copy teslalogger/TeslaLogger/App.config as teslalogger/TeslaLogger/bin/TeslaLogger.exe.config and make the changes above.
Tesla Setup
Pre-requisites
- You need to have an FQDN and DNS record that points to the IP you're hosting this on. You also need to port forward ports:
12345,4443.
Notes
- When creating a developer application, set the origin URL as the same domain you used in the docker compose. (eg: yourtelemetry.domainname.com)
- For redirect URL, you can set it to whatever you want. It really doesn't matter as long as you keep it consistent (eg: localhost)
Make a note of your: client_id, redirect_uri, VIN
Steps
- Complete step 1-8 from https://github.com/teslamotors/fleet-telemetry?tab=readme-ov-file#configuring-and-running-the-service
- Get your tokens and authorize your app.
https://fleet-auth.prd.vn.cloud.tesla.com/oauth2/v3/authorize?&client_id={client_id}&locale=en-US&prompt=login&redirect_uri={redirect_uri}&response_type=code&scope=openid vehicle_device_data offline_access&state=$STATE- After you authenticate, you will be redirected to
https://{redirect_uri}/?locale=en-US&code=NA_xxxxx&state=%24STATE&issuer=https%3A%2F%2Ffleet-auth.tesla.com%2Foauth2%2Fv3 - Write down the token in the
codeparameter. (NA_xxxxxxxx)
- Now you can get your access token!
CODE=NA_xxx
CLIENT_ID=YOUR_APP_CLIENT_ID
CLIENT_SECRET=YOUR_APP_CLIENT_SECRET
AUDIENCE=https://fleet-api.prd.na.vn.cloud.tesla.com
CALLBACK=YOUR_REDIRECT_URI
curl --request POST \
  --header 'Content-Type: application/x-www-form-urlencoded' \
  --data-urlencode 'grant_type=authorization_code' \
  --data-urlencode "client_id=$CLIENT_ID" \
  --data-urlencode "client_secret=$CLIENT_SECRET" \
  --data-urlencode "code=$CODE" \
  --data-urlencode "audience=$AUDIENCE" \
  --data-urlencode "redirect_uri=$CALLBACK" \
'https://fleet-auth.prd.vn.cloud.tesla.com/oauth2/v3/token'- This will return something like:
{"access_token":"eyJhbGciOiJSUxxx","refresh_token":"NA_xxx","id_token":"eyJhbGciOxxx","expires_in":28800,"state":"$STATE","token_type":"Bearer"}% - Keep track of the access_token and your refresh_token.
- Pair the Virtual key:
- On your phone with the Tesla app installed, go to this URL (replace placeholder with your FQDN):
https://tesla.com/_ak/yourtelemetry.domainname.com
- On your phone with the Tesla app installed, go to this URL (replace placeholder with your FQDN):
- Configure fleet telemetry (this is what instructs Tesla's API to stream data to your telemetry-server. Note the curl URL is to your command_proxy):
- export TESLA_AUTH_TOKEN=your_access_token
- For the "ca" field, you can get the certificate authority certificate by running
openssl s_client -showcerts -connect yourtelemetry.domainname.com:12345- The string you're looking for is just under
1 s:C=US, O=Let's Encrypt, CN=E5...--—BEGIN CERTIFICATE--—. REMOVE all line breaks and insert it to the code snippet below at CERTIFICATE_DATA_HERE.
curl -H "Authorization: Bearer $TESLA_AUTH_TOKEN" \
     -H 'Content-Type: application/json' \
     --data '{
  "vins": ["YOUR_CAR_VIN"],
  "config": {
    "hostname": "yourtelemetry.domainname.com",
    "port": 12345,
    "ca": "-----BEGIN CERTIFICATE-----\nCERTIFICATE_DATA_HERE\n-----END CERTIFICATE-----\n",
    "fields": {
      "PackVoltage": { "interval_seconds": 10 },
      "PackCurrent": { "interval_seconds": 10 },
      "ACChargingPower": { "interval_seconds": 10 },
      "ACChargingEnergyIn" : { "interval_seconds": 60 },
      "DCChargingPower": { "interval_seconds": 1 },
      "DCChargingEnergyIn" : { "interval_seconds": 30 },
      "ChargeLimitSoc": { "interval_seconds": 30 },
      "FastChargerPresent": { "interval_seconds": 5 },
      "Location": { "interval_seconds": 1 },
      "VehicleSpeed": { "interval_seconds": 1 },
      "Gear": { "interval_seconds": 5 },
      "EstBatteryRange": { "interval_seconds": 30 },
      "RatedRange": { "interval_seconds": 30 },
      "IdealBatteryRange": { "interval_seconds": 30 },
      "Soc": { "interval_seconds": 15 },
      "ModuleTempMax": { "interval_seconds": 60 },
      "NumModuleTempMax": { "interval_seconds": 60 },
      "ModuleTempMin": { "interval_seconds": 60 },
      "NumModuleTempMin": { "interval_seconds": 60 },
      "NumBrickVoltageMax": { "interval_seconds": 60 },
      "BrickVoltageMax": { "interval_seconds": 60 },
      "NumBrickVoltageMin": { "interval_seconds": 60 },
      "BrickVoltageMin": { "interval_seconds": 60 },
      "Odometer": { "interval_seconds": 30 },
      "EnergyRemaining": { "interval_seconds": 60 },
      "TimeToFullCharge": { "interval_seconds": 60 },
      "EstBatteryRange": { "interval_seconds": 60 },
      "SentryMode": { "interval_seconds": 10 },
      "ChargeState": { "interval_seconds": 10 },
      "DetailedChargeState": { "interval_seconds": 10 },
      "BatteryHeaterOn": { "interval_seconds": 10 },
      "DoorState": { "interval_seconds": 10 },
      "FdWindow": { "interval_seconds": 10 },
      "FpWindow": { "interval_seconds": 10 },
      "RdWindow": { "interval_seconds": 10 },
      "RpWindow": { "interval_seconds": 10 },
      "TpmsPressureFl": { "interval_seconds": 10 },
      "TpmsPressureFr": { "interval_seconds": 10 },
      "TpmsPressureRl": { "interval_seconds": 10 },
      "TpmsPressureRr": { "interval_seconds": 10 },
      "VehicleName": { "interval_seconds": 600 },
      "CarType": { "interval_seconds": 600 },
      "Trim": { "interval_seconds": 600 },
      "Version": { "interval_seconds": 600 },
      "InsideTemp": { "interval_seconds": 60 },
      "OutsideTemp": { "interval_seconds": 60 },
      "Locked": { "interval_seconds": 5 },
      "ChargePortDoorOpen": { "interval_seconds": 10 },
      "PreconditioningEnabled": { "interval_seconds": 30 },
      "DefrostForPreconditioning": { "interval_seconds": 30 },
      "DefrostMode": { "interval_seconds": 60 },
      "FastChargerType": { "interval_seconds": 10 },
      "HvacACEnabled": { "interval_seconds": 60 },
      "HvacAutoMode": { "interval_seconds": 60 },
      "HvacLeftTemperatureRequest": { "interval_seconds": 60 },
      "HvacSteeringWheelHeatAuto": { "interval_seconds": 60 },
      "HvacSteeringWheelHeatLevel": { "interval_seconds": 60 },
      "SoftwareUpdateVersion": { "interval_seconds": 600 },
      "SoftwareUpdateDownloadPercentComplete": { "interval_seconds": 600 },
      "SoftwareUpdateExpectedDurationMinutes": { "interval_seconds": 600 },
      "SoftwareUpdateInstallationPercentComplete": { "interval_seconds": 600 },
      "SoftwareUpdateScheduledStartTime": { "interval_seconds": 600 },
      "WiperHeatEnabled": { "interval_seconds": 60 }
    }
  }
}' \
      -X POST \
-i https://yourtelemetry.domainname.com:4443/api/1/vehicles/fleet_telemetry_config- You can verify this propagated by running:
curl -H "Authorization: Bearer $TESLA_AUTH_TOKEN" -i "https://yourtelemetry.domainname.com:4443/api/1/vehicles/$VIN/fleet_telemetry_config" - You're ready to add your keys to TeslaLogger!
- id is the car ID that corresponds to the car you want to add in TeslaLogger (Eg: Car 1 => id=1).
your_teslalogger.com:8888/admin/password_fleet.php?id=1&vin=YOUR_CAR_VIN&AT=eyJhbGcxxxxxxxxx&RT=NA_xxxxxxx
- Check the log to make sure there are no errors.
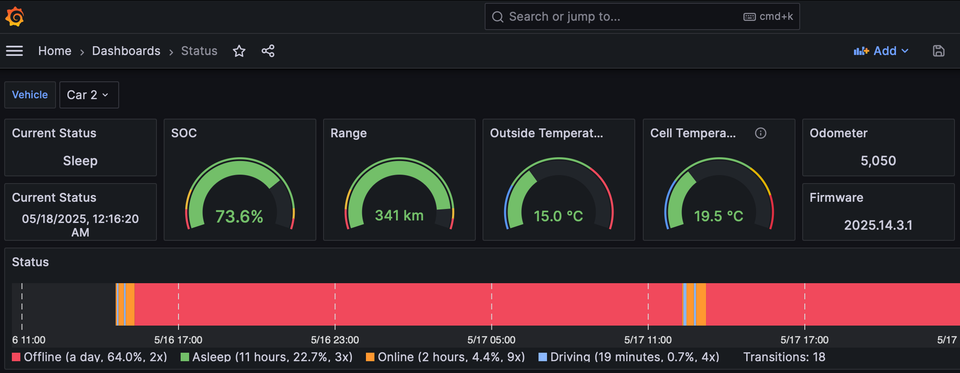
Congratulations, you did it!
Member discussion